
I am a HUGE Starbucks fan, but not a fan of the price anymore so I was pretty excited to find this post about how to make your own frappuccinos at home!
My kids like the coffee free ones too so I think it's time for so home made goodies this week!
Make a Starbucks Frappuccino at home!
Wednesday, July 13, 2011

Sunday, June 26, 2011
Smooth summer nights
This all started because I really wanted a milk shake but did not have ice cream, nor did I NEED to have ice cream in the house for my healths sake! :)
After experimenting with amounts of yogurt and what fruit I had on hand here is my fruit smoothie recipe that I enjoyed this evening and shared with the family!
1 cup frozen halved strawberries
1/2 cup frozen mango chunks
3 halves of my home made jarred peaches (that will be another post!) :)
1/4 cup of peach juice from jarred peaches
1/2 cup of low fat strawberry yogurt
Because I use frozen fruit for the most part I do not need to add ice to make this of milk shake or frozen smoothie consistency obviously.
My wonderful blender has a "frozen drink" setting on it and I just use this, but basically is does it on medium/slow/medium/high to chop and mix it all really well.
I also use all organic or natural products so this is good for me and the local community as I prefer to buy from farmers markets or support USA goods!
After experimenting with amounts of yogurt and what fruit I had on hand here is my fruit smoothie recipe that I enjoyed this evening and shared with the family!
1 cup frozen halved strawberries
1/2 cup frozen mango chunks
3 halves of my home made jarred peaches (that will be another post!) :)
1/4 cup of peach juice from jarred peaches
1/2 cup of low fat strawberry yogurt
Because I use frozen fruit for the most part I do not need to add ice to make this of milk shake or frozen smoothie consistency obviously.
My wonderful blender has a "frozen drink" setting on it and I just use this, but basically is does it on medium/slow/medium/high to chop and mix it all really well.
I also use all organic or natural products so this is good for me and the local community as I prefer to buy from farmers markets or support USA goods!
Saturday, June 25, 2011
frijoles refritos
I am in no way CLOSE to being of Mexican decent but I do love a great Mexican meal! Our family goes through a LOT of refried beans for various reasons so I thought I would try my hand at making my own at home to freeze for future use and to avoid the whole processed food approach too.


colander
heavy stock pot
large frying pan
seasonings to taste (I plan on using garlic, salt and pepper and cumin)
1 potato masher
Rinse off beans in colander and make sure there are no stones or loose bits in bean pile.
Let sit in a large stock pot overnight, Since I had about 4 cups of beans I used about 10 cups of water to soak them in as they do expand a lot!
When done soaking, rinse again and then put back in clean stock pot and cover with water. Low boil for about an hour, after that hour is up and adding more water to keep beans covered see if they are soft yet. If they are still hard keep boiling until they are all soft enough to mash by hand.
Pour out excess water leaving just enough to cover the bottom of the beans and to make sure they don't dry out.
Mash with potato masher or large fork, whichever is available.
Place mashed beans into frying pan that has 2 Tbs of (pre heated)olive or canola oil in it. Fry up with seasonings. Don't overdo it as you might burn or over dry them out.
Serve and enjoy!
Optional: cover with cheese or add chilis to beans.
I plan on saving some to serve and freezing some for later use.


colander
heavy stock pot
large frying pan
seasonings to taste (I plan on using garlic, salt and pepper and cumin)
1 potato masher
Rinse off beans in colander and make sure there are no stones or loose bits in bean pile.
Let sit in a large stock pot overnight, Since I had about 4 cups of beans I used about 10 cups of water to soak them in as they do expand a lot!
When done soaking, rinse again and then put back in clean stock pot and cover with water. Low boil for about an hour, after that hour is up and adding more water to keep beans covered see if they are soft yet. If they are still hard keep boiling until they are all soft enough to mash by hand.
Pour out excess water leaving just enough to cover the bottom of the beans and to make sure they don't dry out.
Mash with potato masher or large fork, whichever is available.
Place mashed beans into frying pan that has 2 Tbs of (pre heated)olive or canola oil in it. Fry up with seasonings. Don't overdo it as you might burn or over dry them out.
Serve and enjoy!
Optional: cover with cheese or add chilis to beans.
I plan on saving some to serve and freezing some for later use.
Monday, November 15, 2010
Why use canned when you can have fresh?

I have never made my own pureed pumpkin before but thought I would give it a try this year thanks to some encouragement from one of my husbands friends and oh the free pumpkins from his work didn't hurt either. :)
1. Split the pumpkins in half and scrape out the seeds/pulp.
2. On a rimmed cookie sheet, pour a half cup of water and put the pumpkins cut side down.
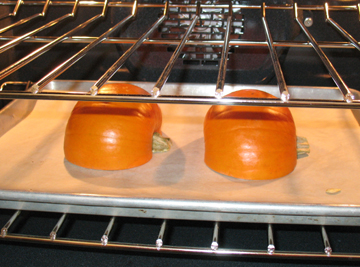
3. Roast at 350 for 45-60 minutes, until soft.
4. When cool enough to handle, I scoop the flesh out of the pumpkin.
You can run it through a food mill so that any seeds, skin or pulp that are missed get strained out when pureed, or alternately use a potato masher, blender, food processor, etc.
Freezing the puree guarantees you have pumpkin to cook with year round instead of hunting around for the canned stuff in the off season at your local grocery store.
Whole chicken in a crock pot
This is a GREAT way to save time and money on chicken.
Buying a whole chicken can be much cheaper then buying it piece by piece and you can have fresh chicken broth when you're done!
I got this from The Happy Housewife's blog and so I encourage you to follow the link on over there!
Whole Chicken in a Crock pot.
Buying a whole chicken can be much cheaper then buying it piece by piece and you can have fresh chicken broth when you're done!
I got this from The Happy Housewife's blog and so I encourage you to follow the link on over there!
Whole Chicken in a Crock pot.
Turkey Chili
This one comes from the cookbook "Deceptively Delicious" by Jessica Seinfeld (yes she's married to THAT Seinfeld) :)

Prep 15 minutes Total 35 minutes Serves 8
**I doubled this one though so it took a little longer to cook**
Nonstick cooking spray
1 Tbs Olive oil
1/2 C chopped red onion
1 lb lean ground turkey
2 cloves of garlic, minced (I used my grater plater for this one!)
1 Tbs chili powder, or to taste
1 tsp salt
1/4 sp sweet paprika
1/8 tsp pepper
1 (15 oz) can chopped tomatoes
1 (26 oz) carton of reduced fat low sodium chicken broth (I used my vegetarian/organic bouillon chicken cubes for this one)
1/2 C red pepper puree (this is one of her "trick" veggie slip ins since I didn't have this I used red pepper instead to spice it up a bit, only about 1 tsp.)
1/2 C carrot puree (another one of her "truck" veggie slip ins that I just did right there while cooking.)
1/4 C cornmeal
2 Tbs flaxseed meal (I could NOT for the life of me find this so we skipped it)
1 (15 oz) can kidney beans, drained and rinsed
Coat the bottom of a large pot with cooking spray and set over medium heat. When the pot is hot, add the oil. Add the onion and cook until it begins to soften, about 2 minutes.
Meanwhile sprinkle the turkey with the garlic, chili powder, salt, paprika and pepper. Add the turkey to the pot and cook, stirring occasionally, until the turkey is no longer pink.
Stir in the tomatoes. Add the broth, red pepper puree, carrot puree, cornmeal, and flaxseed meal, stir well. Bring to a boil, reduce the heat, and simmer, covered. 15-20 minutes, or until the flavors have blended. Stir in the beans and cook a little longer, just to heat them through and to help thicken.

Prep 15 minutes Total 35 minutes Serves 8
**I doubled this one though so it took a little longer to cook**
Nonstick cooking spray
1 Tbs Olive oil
1/2 C chopped red onion
1 lb lean ground turkey
2 cloves of garlic, minced (I used my grater plater for this one!)
1 Tbs chili powder, or to taste
1 tsp salt
1/4 sp sweet paprika
1/8 tsp pepper
1 (15 oz) can chopped tomatoes
1 (26 oz) carton of reduced fat low sodium chicken broth (I used my vegetarian/organic bouillon chicken cubes for this one)
1/2 C red pepper puree (this is one of her "trick" veggie slip ins since I didn't have this I used red pepper instead to spice it up a bit, only about 1 tsp.)
1/2 C carrot puree (another one of her "truck" veggie slip ins that I just did right there while cooking.)
1/4 C cornmeal
2 Tbs flaxseed meal (I could NOT for the life of me find this so we skipped it)
1 (15 oz) can kidney beans, drained and rinsed
Coat the bottom of a large pot with cooking spray and set over medium heat. When the pot is hot, add the oil. Add the onion and cook until it begins to soften, about 2 minutes.
Meanwhile sprinkle the turkey with the garlic, chili powder, salt, paprika and pepper. Add the turkey to the pot and cook, stirring occasionally, until the turkey is no longer pink.
Stir in the tomatoes. Add the broth, red pepper puree, carrot puree, cornmeal, and flaxseed meal, stir well. Bring to a boil, reduce the heat, and simmer, covered. 15-20 minutes, or until the flavors have blended. Stir in the beans and cook a little longer, just to heat them through and to help thicken.
mexi deli rolls revisited
Mexi deli rolls were something my mom used to make as a quick lunch/dinner idea that was fast and very filling when I was kid.
However this time around in making them I didn't have the exact ingredients she had so I improvised a bit.
Mexi Deli rolls
1 package of Flour tortillas (on average we have 1-2 rolls per person depending on the age here so my family usually uses 10 tortillas)
Sliced deli ham
Sliced turkey smoked or regular will do
guacamole (we didn't have this so we used sliced avocado and I liked it better!)
sour cream
shredded iceberg lettuce (I only had romaine so I used 1 leaf per roll)
shredded mexican or shredded cheddar cheese
toothpicks
I spread a little bit of sour cream and guacamole on the tortilla maybe about a 1/2 Tbs but you can do this to taste. Then lay slices of ham and turkey usually about 2 each and finally put some cheese and lettuce on top of that to taste I do about a little less then a 1/4 or so.
Last but not least roll tightly without splitting the tortilla and use a toothpick to hold together if necessary.
Can be served with chips and salsa.
However this time around in making them I didn't have the exact ingredients she had so I improvised a bit.
Mexi Deli rolls
1 package of Flour tortillas (on average we have 1-2 rolls per person depending on the age here so my family usually uses 10 tortillas)
Sliced deli ham
Sliced turkey smoked or regular will do
guacamole (we didn't have this so we used sliced avocado and I liked it better!)
sour cream
shredded iceberg lettuce (I only had romaine so I used 1 leaf per roll)
shredded mexican or shredded cheddar cheese
toothpicks
I spread a little bit of sour cream and guacamole on the tortilla maybe about a 1/2 Tbs but you can do this to taste. Then lay slices of ham and turkey usually about 2 each and finally put some cheese and lettuce on top of that to taste I do about a little less then a 1/4 or so.
Last but not least roll tightly without splitting the tortilla and use a toothpick to hold together if necessary.
Can be served with chips and salsa.
Tuesday, October 26, 2010
Sweet yam and pumpkin puff
This was originally a recipe I got from the magazine ParentLife in the Taste of Life section titled "Eat What You Love; yummy fall recipes low in sugar, fat and calories"
But I tweaked it so I could use what I had on hand and so now it's no longer low fat or low in calories but still yummy! :)
Sweet Potato Puff (original title)
Ingredients :
2 lbs dark sweet potatoes or yams (2 cups mashed)
1 cup canned pumpkin puree or fresh if you like
1 large egg
3 large egg whites (this is where I fudged it and just used 3 regular eggs instead of the separate egg ingredients)
1/2 c. light sour cream
2/3 c. splenda or other low calorie sweetener (I used organic sugar instead)
1 Tbs margarine or butter, melted
3/4 tsp. cinnamon (I used 1 tsp because I like to lay on the seasoning)
1 tsp. baking powder
1/4 tsp salt (oops I forgot to add this)
1 tsp. vanilla extract
1/4 c. chopped pecans (I used almond slices because it was what I had and I don't like pecans much.)
Directions :
Pierce the sweet potatoes with a fork and place in microwave. Cook on high for 10 minutes or until the flesh is soft.
Preheat oven to 350 degrees Fahrenheit.
Coat a 2 quart casserole or souffle dish with nonstick cooking spray.
Cut the sweet potatoes or yams in half and scoop out the flesh into a large mixing bowl. Add the remaining ingredients, except the nuts, and beat until smooth. I put my mix in my kitchenaid mixer unit and had it on a number 4 for about 8 minutes or however long it takes me to fold a load of laundry. ;)
Spoon into the casserole dish and smooth the top. Sprinkle the top with nuts.
Bake for 25-35 minutes or until the center slightly puffs.
Thank you to Marlene Koch and her book Eat What YOU love.
But I tweaked it so I could use what I had on hand and so now it's no longer low fat or low in calories but still yummy! :)
Sweet Potato Puff (original title)
Ingredients :
2 lbs dark sweet potatoes or yams (2 cups mashed)
1 cup canned pumpkin puree or fresh if you like
1 large egg
3 large egg whites (this is where I fudged it and just used 3 regular eggs instead of the separate egg ingredients)
1/2 c. light sour cream
2/3 c. splenda or other low calorie sweetener (I used organic sugar instead)
1 Tbs margarine or butter, melted
3/4 tsp. cinnamon (I used 1 tsp because I like to lay on the seasoning)
1 tsp. baking powder
1/4 tsp salt (oops I forgot to add this)
1 tsp. vanilla extract
1/4 c. chopped pecans (I used almond slices because it was what I had and I don't like pecans much.)
Directions :
Pierce the sweet potatoes with a fork and place in microwave. Cook on high for 10 minutes or until the flesh is soft.
Preheat oven to 350 degrees Fahrenheit.
Coat a 2 quart casserole or souffle dish with nonstick cooking spray.
Cut the sweet potatoes or yams in half and scoop out the flesh into a large mixing bowl. Add the remaining ingredients, except the nuts, and beat until smooth. I put my mix in my kitchenaid mixer unit and had it on a number 4 for about 8 minutes or however long it takes me to fold a load of laundry. ;)
Spoon into the casserole dish and smooth the top. Sprinkle the top with nuts.
Bake for 25-35 minutes or until the center slightly puffs.
Thank you to Marlene Koch and her book Eat What YOU love.
Thursday, October 21, 2010
Cooking for 2.....ok it's more then that now.
Wow has it really been since June that I last posted? Wow I am SO sorry! *insert blushing face here*
Life has really gotten away from me and so has my goal of cooking well for my family.
I really want to cook I do, I'm just so rotten at it and not to mention a major procrastinator too.
Early this fall we found out that we are being blessed with another little one come spring and so cooking has taken a back seat or rather far far away vacation from my mind.
Don't get me wrong I LOVE to eat! I just don't like having to prepare it so much anymore....though I still love baking...hmmm
Today's recipe is nothing fancy really, just something I threw together for my son's birthday.
1 box of white cake mix (and coordinating ingredients to make such cake)
orange food coloring or red and yellow to create an orange colored batter (color to taste, in our case it was hunters, fluorescent orange!)
Tub of orange frosting (handy this time of year being October, but if not availiable just color white frosting orange in a bowl.)
Colored frosting for whatever design you are making, I got black and yellow as I am making the bat signal on this cake.
My son loves the color orange and camouflage but since camo is hard for me right now to do on a budget I stuck with orange and am using his Lego batman figurines as cake toppers! Yes I made sure to disinfect them before placing them on the cake.

Prepare cake according to package instructions, cool then frost with orange frosting.
Since I am doing a bat signal on this cake I printed out some batman coloring sheets
 for inspiration, you can use them as templates if you trace the design on wax paper and then cut it out like a regular stencil. But make sure your frosting has set and hardened before you do this otherwise you will have frosting all over the stencil and a choppy looking top to your cake! :)
Life has really gotten away from me and so has my goal of cooking well for my family.
I really want to cook I do, I'm just so rotten at it and not to mention a major procrastinator too.
Early this fall we found out that we are being blessed with another little one come spring and so cooking has taken a back seat or rather far far away vacation from my mind.
Don't get me wrong I LOVE to eat! I just don't like having to prepare it so much anymore....though I still love baking...hmmm
Today's recipe is nothing fancy really, just something I threw together for my son's birthday.
1 box of white cake mix (and coordinating ingredients to make such cake)
orange food coloring or red and yellow to create an orange colored batter (color to taste, in our case it was hunters, fluorescent orange!)
Tub of orange frosting (handy this time of year being October, but if not availiable just color white frosting orange in a bowl.)
Colored frosting for whatever design you are making, I got black and yellow as I am making the bat signal on this cake.
My son loves the color orange and camouflage but since camo is hard for me right now to do on a budget I stuck with orange and am using his Lego batman figurines as cake toppers! Yes I made sure to disinfect them before placing them on the cake.

Prepare cake according to package instructions, cool then frost with orange frosting.
Since I am doing a bat signal on this cake I printed out some batman coloring sheets

 for inspiration, you can use them as templates if you trace the design on wax paper and then cut it out like a regular stencil. But make sure your frosting has set and hardened before you do this otherwise you will have frosting all over the stencil and a choppy looking top to your cake! :)
Monday, June 21, 2010
To train up a child....in cooking that is!
Inspired by a recent visit to the In laws house my daughter really wanted to cook today.
We had already planned to do food lessons all summer long now that school was out but we started earlier then planned now.
So thank you cousin J for your inspiration and the yummy chocolate chip cookies!
Oh and did I mention cousin J is a lovely 10 yr old girl! :)
G (my 9 yr old) has made food without adult help in the past, nothing elaborate just your basic Kraft Man n' Cheese though I now prefer to give them the Annie's Homegrown brand only because it's all organic and much healthier then the other types.
She can also scramble up a mean egg and has started on pancakes though those still need some work.
Today however she made brownies for us, granted they are not from scratch just the boxed kind but she did it alone and got everything assembled and put together without mom reminding her what goes where.
She got a quick lesson in being careful while leaning over to put a pan in a hot oven (ouch moment!) no burns just a bit of warmth. I believe every kid needs to learn this lesson, maybe not completely the "hard way" but enough that they know not to reach willy nilly into a hot oven!
Right now the delicious smell of double chocolate funfetti brownies is wafting through the house as we anxiously await a bit of their gooey goodness!
Here's hoping she remembers how and when take them out when the buzzer goes off!
We had already planned to do food lessons all summer long now that school was out but we started earlier then planned now.
So thank you cousin J for your inspiration and the yummy chocolate chip cookies!
Oh and did I mention cousin J is a lovely 10 yr old girl! :)
G (my 9 yr old) has made food without adult help in the past, nothing elaborate just your basic Kraft Man n' Cheese though I now prefer to give them the Annie's Homegrown brand only because it's all organic and much healthier then the other types.
She can also scramble up a mean egg and has started on pancakes though those still need some work.
Today however she made brownies for us, granted they are not from scratch just the boxed kind but she did it alone and got everything assembled and put together without mom reminding her what goes where.
She got a quick lesson in being careful while leaning over to put a pan in a hot oven (ouch moment!) no burns just a bit of warmth. I believe every kid needs to learn this lesson, maybe not completely the "hard way" but enough that they know not to reach willy nilly into a hot oven!
Right now the delicious smell of double chocolate funfetti brownies is wafting
 through the house as we anxiously await a bit of their gooey goodness!
Here's hoping she remembers how and when take them out when the buzzer goes off!
Tuesday, May 25, 2010
Sloppys Joes night!
I make my sloppy joes with ground turkey and they still taste alright to me! Normally I admit I cheat and use Manwich
But today since I did not have that and wanted an even healthier alternative I started experimenting with what I had! :)
2 lbs lean ground turkey
2 T dried onion flakes
4-6 T Worcestershire sauce (I do this to taste mainly)
1/4 c brown sugar
1 tsp powdered ginger
1/2 c ketchup
2 tsp dried ground garlic
1 package of thinwiches or sara lee hamburger thins
Brown turkey with onion, then add other ingredients save for the buns.
Let sit for a few minutes to sauce to thicken and serve on buns.

But today since I did not have that and wanted an even healthier alternative I started experimenting with what I had! :)
2 lbs lean ground turkey
2 T dried onion flakes
4-6 T Worcestershire sauce (I do this to taste mainly)
1/4 c brown sugar
1 tsp powdered ginger
1/2 c ketchup
2 tsp dried ground garlic
1 package of thinwiches or sara lee hamburger thins
Brown turkey with onion, then add other ingredients save for the buns.
Let sit for a few minutes to sauce to thicken and serve on buns.
Friday, April 9, 2010
In a pinch if you forget....
Soooooo while meal planning, totally blanked that don't have any BBQ sauce!
So here's a handy dandy recipe for some!
Yummy BBQ Sauce
Ingredients
1 cup Ketchup
1 Small onion chopped
1/4 cup White Vinegar
1/4 cup Brown Sugar
2 TBSP Butter
2 TBSP Worcestershire Sauce
2 TBSP Mustard
2 TBSP Molasses
1 Garlic clove minced
Red pepper flakes to taste (optional)
Directions
Start with butter in sauce pan then add onions. Let them cook just a few minutes until a little soft. Then add the rest of the ingredients. Let simmer for about 15 minutes to thicken.
Number of Servings: 24
So here's a handy dandy recipe for some!
Yummy BBQ Sauce
Ingredients
1 cup Ketchup
1 Small onion chopped
1/4 cup White Vinegar
1/4 cup Brown Sugar
2 TBSP Butter
2 TBSP Worcestershire Sauce
2 TBSP Mustard
2 TBSP Molasses
1 Garlic clove minced
Red pepper flakes to taste (optional)
Directions
Start with butter in sauce pan then add onions. Let them cook just a few minutes until a little soft. Then add the rest of the ingredients. Let simmer for about 15 minutes to thicken.
Number of Servings: 24
Low fat and still yummy!
This one is thanks to spark people's recipe book, pulled chicken BBQ sandwiches made easy!
Ingredients
* 4 boneless, skinless chicken breasts
* A dash of salt and pepper
* 14 Tbsp (about a half bottle) KC Masterpiece Low Calorie Classic Blend BBQ Sauce
* 6 whole wheat hamburger buns
Directions
Place chicken breasts, along with salt and pepper to taste, in a large pot of water and boil until fully cooked through. (Time will vary depending on whether you are using fresh or frozen chicken.)
Once the chicken is cooked, use a fork to pull the meat apart so it is thickly shredded. (Shredding too finely will cause the sandwich to become mushy once sauce is added.) Place pulled chicken in a large bowl.
Add a half bottle (approx. 7 servings worth, or about 14 tbsp.) of BBQ sauce. Toss until chicken is coated.
Distribute chicken evenly onto buns. You may choose to toast the buns first, or add toppings like lettuce or red onion to the mixture, or spread a small amount of the sauce right onto the bun before assembling. This delicious alternative to the classic bbq sandwich will be a hit any way you serve it!
Makes about 6 sandwiches
Ingredients
* 4 boneless, skinless chicken breasts
* A dash of salt and pepper
* 14 Tbsp (about a half bottle) KC Masterpiece Low Calorie Classic Blend BBQ Sauce
* 6 whole wheat hamburger buns
Directions
Place chicken breasts, along with salt and pepper to taste, in a large pot of water and boil until fully cooked through. (Time will vary depending on whether you are using fresh or frozen chicken.)
Once the chicken is cooked, use a fork to pull the meat apart so it is thickly shredded. (Shredding too finely will cause the sandwich to become mushy once sauce is added.) Place pulled chicken in a large bowl.
Add a half bottle (approx. 7 servings worth, or about 14 tbsp.) of BBQ sauce. Toss until chicken is coated.
Distribute chicken evenly onto buns. You may choose to toast the buns first, or add toppings like lettuce or red onion to the mixture, or spread a small amount of the sauce right onto the bun before assembling. This delicious alternative to the classic bbq sandwich will be a hit any way you serve it!
Makes about 6 sandwiches
Monday, April 5, 2010
crock pot casseroles
I am a huge fan of crock pots, this weekend I used mine yet again to make a chicken and black bean casserole of sorts.
Instead of cutting up the chicken though I laid the half breast pieces flat on the bottom of the crock pot and piled everything else on top of them.
Ingredients
1 can organic black beans
1 cup of frozen organic sweet corn
2 cups of dry long grain white rice
4 chicken breasts (1/2 pieces from Foster Farms all natural packs) ** you can shred or cut up to mix, I left mine whole**
1 cup of medium salsa (I used Herdez salsa)
2 cups of water or chicken broth for rice
Place chicken in crock pot if left whole, otherwise just layer in with rice, beans and veggies lasagna style.
Since I left my chicken whole I put it in first, then the rice with liquid to moisten, black beans, corn and then topped it all with the salsa.
Set crock pot on low for 10-12 hrs or high for 4-6 hrs.
When rice is soft mix all together.
Instead of cutting up the chicken though I laid the half breast pieces flat on the bottom of the crock pot and piled everything else on top of them.
Ingredients
1 can organic black beans
1 cup of frozen organic sweet corn
2 cups of dry long grain white rice
4 chicken breasts (1/2 pieces from Foster Farms all natural packs) ** you can shred or cut up to mix, I left mine whole**
1 cup of medium salsa (I used Herdez salsa)
2 cups of water or chicken broth for rice
Place chicken in crock pot if left whole, otherwise just layer in with rice, beans and veggies lasagna style.
Since I left my chicken whole I put it in first, then the rice with liquid to moisten, black beans, corn and then topped it all with the salsa.
Set crock pot on low for 10-12 hrs or high for 4-6 hrs.
When rice is soft mix all together.
Sunday, March 28, 2010
Lamb chops play along!
Ok so the title MIGHT be a little sick sounding to those of you who remember the show.....especially since this is about how to cook a lamb chop! ha ha ha
Herb and Garlic Lamb chop
Ingredients
1 4-ounce lamb chop
1/2 teaspoon extra virgin olive oil
1/2 teaspoon dried rosemary
1/2 teaspoon kosher salt
1/4 teaspoon freshly ground black pepper
1 clove of garlic, mashed
Directions
Preheat a grill or broiler to high.
Rub the olive oil over the entire lamb chop.
Mix the rosemary, salt, pepper and garlic and rub over the chop.
Grill, turning once, until personal level of doneness is achieved, 10-15 minutes.
Number of Servings: 1
Herb and Garlic Lamb chop
Ingredients
1 4-ounce lamb chop
1/2 teaspoon extra virgin olive oil
1/2 teaspoon dried rosemary
1/2 teaspoon kosher salt
1/4 teaspoon freshly ground black pepper
1 clove of garlic, mashed
Directions
Preheat a grill or broiler to high.
Rub the olive oil over the entire lamb chop.
Mix the rosemary, salt, pepper and garlic and rub over the chop.
Grill, turning once, until personal level of doneness is achieved, 10-15 minutes.
Number of Servings: 1
Charoset for the seder
I got this recipe from Spark people.com but have tweaked it a little bit to fit with what I have handy.
Though tasty it is a little muddy looking which is the point! Charoset is supposed to represent the mud/straw mixture that the Israelites used to make bricks or mortar for the buildings they had to make as slaves for Pharaoh.
Ingredients
6 apples, unpeeled
2 cup ground walnuts (I will use almonds as I'm allergic to walnuts)
2 teaspoon cinnamon
Passover wine to moisten (I will use juice instead since we don't drink)
Honey to taste
Directions
Chop apples (do not peel).
Grind walnuts in food processor to make powdery substance.
Combine apples and nuts in bowl and stir in wine. Add enough wine so that the nuts create an almost paste. Add honey to sweeten.
Chill for at least 2 hours. Add more wine and/or honey as necessary.
Number of Servings: 16
Though tasty it is a little muddy looking which is the point! Charoset is supposed to represent the mud/straw mixture that the Israelites used to make bricks or mortar for the buildings they had to make as slaves for Pharaoh.
Ingredients
6 apples, unpeeled
2 cup ground walnuts (I will use almonds as I'm allergic to walnuts)
2 teaspoon cinnamon
Passover wine to moisten (I will use juice instead since we don't drink)
Honey to taste
Directions
Chop apples (do not peel).
Grind walnuts in food processor to make powdery substance.
Combine apples and nuts in bowl and stir in wine. Add enough wine so that the nuts create an almost paste. Add honey to sweeten.
Chill for at least 2 hours. Add more wine and/or honey as necessary.
Number of Servings: 16
Passover Seder
When I was younger my girls group Missionettes used to observe passover somewhat.
Being a Protestant church there wasn't a heavy emphasis on it but because we studied the old testament women we did talk about some of the festivals that they celebrated as well.
The other day I realized my kids didn't know what passover really was, they had no idea that Jews today and some Christians still celebrated the release of God's people from Egypt or how today as a remembrance of Jesus's last supper.
So today and tomorrow I plan on making a few dishes that reflect on passover and hope to teach my children a little bible history through taste and story.
Unleavened Bread for Lord's Supper or Passover
Ingredients
Whole Wheat Flour, 4 cups
Cilantro, 2 heaping teaspoons
Salt, 1 level teaspoon
Canola Oil, 3/4 cup
Water, 3/4 cup
Directions
Preheat the oven to 350 degrees F and grease a cookie sheet.
Chop fine or crush the cilantro and then mix it with the salt. Add this to the flour.
Add the oil to the flour and mix well.
Pour the water into the flour mixture and knead lightly. It will be ready when the dough is no longer sticky. Add extra water 1 tablespoon at a time if the dough is too dry.
Use a rolling pin to roll the unleavened bread dough out on a lightly-floured surface. Flatten the dough to about ½ inch in thickness. Try to make the shape as close as possible to the shape of the pre-greased cookie sheet.
Put the dough on the cookie sheet and cut into triangles or squares. Bake the unleavened bread for 15 to 20 minutes. It will be dry in consistency like a cracker.
Makes around 36 cracker size pieces. Serving size is one cracker.
Number of Servings: 36
Being a Protestant church there wasn't a heavy emphasis on it but because we studied the old testament women we did talk about some of the festivals that they celebrated as well.
The other day I realized my kids didn't know what passover really was, they had no idea that Jews today and some Christians still celebrated the release of God's people from Egypt or how today as a remembrance of Jesus's last supper.
So today and tomorrow I plan on making a few dishes that reflect on passover and hope to teach my children a little bible history through taste and story.
Unleavened Bread for Lord's Supper or Passover
Ingredients
Whole Wheat Flour, 4 cups
Cilantro, 2 heaping teaspoons
Salt, 1 level teaspoon
Canola Oil, 3/4 cup
Water, 3/4 cup
Directions
Preheat the oven to 350 degrees F and grease a cookie sheet.
Chop fine or crush the cilantro and then mix it with the salt. Add this to the flour.
Add the oil to the flour and mix well.
Pour the water into the flour mixture and knead lightly. It will be ready when the dough is no longer sticky. Add extra water 1 tablespoon at a time if the dough is too dry.
Use a rolling pin to roll the unleavened bread dough out on a lightly-floured surface. Flatten the dough to about ½ inch in thickness. Try to make the shape as close as possible to the shape of the pre-greased cookie sheet.
Put the dough on the cookie sheet and cut into triangles or squares. Bake the unleavened bread for 15 to 20 minutes. It will be dry in consistency like a cracker.
Makes around 36 cracker size pieces. Serving size is one cracker.
Number of Servings: 36
Saturday, March 20, 2010
Birthday fun
The 19th was our little one's first birthday so I made a special cake for the occasion.
Nothing special I admit I used a boxed cake recipe the Springtime Funfetti one by Pillsbury.
But what made it special was the Wiltons cake pan that I used, the ballerina bear to be exact.
Then I piped frosting onto the cake to decorate the raised design as well.
Ingredients
Recipe for 2 layer cake or 2 boxes of cake mix (be prepared to have a cookie sheet underneath to catch drippings)
1 can of frosting (about 12-16 oz)
2 bottles of wiltons canned decorator frosting (the kind int he aerosol can w/decorator tips included) I had a pink and a white one
food coloring or however bottle of mini gel frosting for drawing the face features.
Shortening and flour to grease the pan
1 wiltons cake pan!
Grease the pan with shortening leaving no shiny spots behind then dust with flour, make cake according to package directions and pour into pan.
Bake until toothpick inserted comes out clean at 350 degrees Fahrenheit.
When done baking take pan out and set on cooling rack for 15-20 minutes to cool.
Remove cake according to the directions in the wiltons pan booklet (this comes with the pan)

Let cool for another 30 minutes once set right side up.
Frost the sides of cake with a solid color, then take the star tip of your icing decorators and ice in the design according to the pattern directions.
I took 2 days to do this so that the frosting had time to set in between colors so they would not run together or smear.

Nothing special I admit I used a boxed cake recipe the Springtime Funfetti one by Pillsbury.
But what made it special was the Wiltons cake pan that I used, the ballerina bear to be exact.
Then I piped frosting onto the cake to decorate the raised design as well.
Ingredients
Recipe for 2 layer cake or 2 boxes of cake mix (be prepared to have a cookie sheet underneath to catch drippings)
1 can of frosting (about 12-16 oz)
2 bottles of wiltons canned decorator frosting (the kind int he aerosol can w/decorator tips included) I had a pink and a white one
food coloring or however bottle of mini gel frosting for drawing the face features.
Shortening and flour to grease the pan
1 wiltons cake pan!

Grease the pan with shortening leaving no shiny spots behind then dust with flour, make cake according to package directions and pour into pan.
Bake until toothpick inserted comes out clean at 350 degrees Fahrenheit.
When done baking take pan out and set on cooling rack for 15-20 minutes to cool.
Remove cake according to the directions in the wiltons pan booklet (this comes with the pan)

Let cool for another 30 minutes once set right side up.
Frost the sides of cake with a solid color, then take the star tip of your icing decorators and ice in the design according to the pattern directions.
I took 2 days to do this so that the frosting had time to set in between colors so they would not run together or smear.

Tuesday, March 16, 2010
Penne leftovers casserole!
I love leftovers, because it means mama gets a night off from cooking! But sometimes leftovers can be tedious or if you didn't like it much the first time torture!
So this week rather then have spaghetti again or tacos again...I mixed up some of my leftovers with new friends and we had a pretty good casserole!
1 cup leftover spaghetti sauce (with ground beef)
2 cups Prego heart healthy spaghetti sauce
1 lb lean ground beef
8 oz ricotta cheese
1/2 cup shredded mozzarella cheese
1/2 red onion chopped
1/2 clove garlic minced (or you can use garlic powder)
Penne Pasta about 6 servings worth
I reheated the spaghetti/meat sauce mix on the stove top and added in more sauce and 1 lb of lean ground beef (cooked and drained)
Once that started bubbling I added in the onion and garlic for more of a robust flavor.
Boil pasta according to package directions.
Layer meat sauce mix, noodles, mozzarella, ricotta cheese in 9x13 glass baking pan; I did this twice then I topped it all with about a 1/4 c of monterey jack cheese as that was all I had! :)
Bake in 350 degree oven until cheese is melted and warmed all the way through.
So this week rather then have spaghetti again or tacos again...I mixed up some of my leftovers with new friends and we had a pretty good casserole!
1 cup leftover spaghetti sauce (with ground beef)
2 cups Prego heart healthy spaghetti sauce
1 lb lean ground beef
8 oz ricotta cheese
1/2 cup shredded mozzarella cheese
1/2 red onion chopped
1/2 clove garlic minced (or you can use garlic powder)
Penne Pasta about 6 servings worth
I reheated the spaghetti/meat sauce mix on the stove top and added in more sauce and 1 lb of lean ground beef (cooked and drained)
Once that started bubbling I added in the onion and garlic for more of a robust flavor.
Boil pasta according to package directions.
Layer meat sauce mix, noodles, mozzarella, ricotta cheese in 9x13 glass baking pan; I did this twice then I topped it all with about a 1/4 c of monterey jack cheese as that was all I had! :)
Bake in 350 degree oven until cheese is melted and warmed all the way through.
Monday, March 15, 2010
Care Bears for the Mare Bear!
This week is a big week in our household, our youngest is turning 1!
I really like to make special cakes for my family members birthdays and it's always a fun challenge to figure out what to do and how to execute the plan.
Sometimes they're great and sometimes I'm just thankful my kids are excited I can make anything be it great or not so great looking. :)
Currently I am toying with 2 different ideas for my daughters cake, either a castle using one of those castle kits from the craft store or just going from scratch and drawing and creating a template on my own.
Today's adventure led me to some Care bear cakes as our litte ones nickname is Mare Bear.
So here is a recipe for buttercream frosting as I will need to make a lot of this for the cake!
Ingredients:
* 1/2 cup solid vegetable shortening
* 1/2 cup (1 stick) butter or margarine softened
* 1 teaspoon clear vanilla extract
* 4 cups sifted confectioners' sugar (approximately 1 lb.)
* 2 tablespoons milk
Makes: About 3 cups of icing.
instructions
(Medium Consistency)
In large bowl, cream shortening and butter with electric mixer. Add vanilla. Gradually add sugar, one cup at a time, beating well on medium speed. Scrape sides and bottom of bowl often. When all sugar has been mixed in, icing will appear dry. Add milk and beat at medium speed until light and fluffy. Keep bowl covered with a damp cloth until ready to use.
For best results, keep icing bowl in refrigerator when not in use. Refrigerated in an airtight container, this icing can be stored 2 weeks. Rewhip before using.
For thin (spreading) consistency icing, add 2 tablespoons light corn syrup, water or milk.
For Pure White Icing (stiff consistency), omit butter; substitute an additional 1/2 cup shortening for butter and add 1/2 teaspoon No-Color Butter Flavor. Add up to 4 tablespoons light corn syrup, water or milk to thin for icing cakes.
NOTE: Changes in Wilton's traditional recipes have been made due to Trans Fat Free Shortening replacing Hydrogenated Shortening.
I really like to make special cakes for my family members birthdays and it's always a fun challenge to figure out what to do and how to execute the plan.
Sometimes they're great and sometimes I'm just thankful my kids are excited I can make anything be it great or not so great looking. :)
Currently I am toying with 2 different ideas for my daughters cake, either a castle using one of those castle kits from the craft store or just going from scratch and drawing and creating a template on my own.
Today's adventure led me to some Care bear cakes as our litte ones nickname is Mare Bear.
So here is a recipe for buttercream frosting as I will need to make a lot of this for the cake!
Ingredients:
* 1/2 cup solid vegetable shortening
* 1/2 cup (1 stick) butter or margarine softened
* 1 teaspoon clear vanilla extract
* 4 cups sifted confectioners' sugar (approximately 1 lb.)
* 2 tablespoons milk
Makes: About 3 cups of icing.
instructions
(Medium Consistency)
In large bowl, cream shortening and butter with electric mixer. Add vanilla. Gradually add sugar, one cup at a time, beating well on medium speed. Scrape sides and bottom of bowl often. When all sugar has been mixed in, icing will appear dry. Add milk and beat at medium speed until light and fluffy. Keep bowl covered with a damp cloth until ready to use.
For best results, keep icing bowl in refrigerator when not in use. Refrigerated in an airtight container, this icing can be stored 2 weeks. Rewhip before using.
For thin (spreading) consistency icing, add 2 tablespoons light corn syrup, water or milk.
For Pure White Icing (stiff consistency), omit butter; substitute an additional 1/2 cup shortening for butter and add 1/2 teaspoon No-Color Butter Flavor. Add up to 4 tablespoons light corn syrup, water or milk to thin for icing cakes.
NOTE: Changes in Wilton's traditional recipes have been made due to Trans Fat Free Shortening replacing Hydrogenated Shortening.
Subscribe to:
Posts (Atom)


